Happy Lunar New Year!

[Recipe] Rosemary & Potato Sourdough
So I seemed to have accidentally taken a leave from blogging! I duno about you guys, but occasionally it hits me that people other than my friends & family read this thing… and then I get all weird and self conscious and want to burrow back into my hobbit hole. Which is crazy. Because this is the internet… of course someone is reading (ohai sinister governmental spying agency du jour!)
Anyway… I’m ready to crawl back out I think. Maybe.
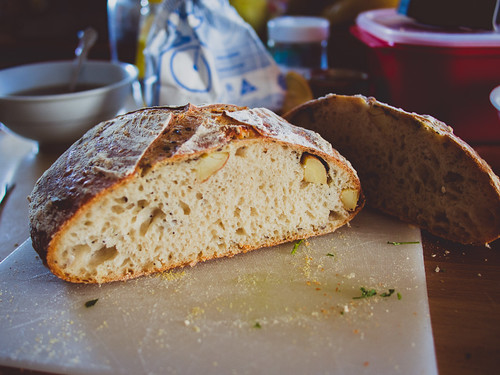
Here’s a bread recipe I’ve been baking quite a lot this year. It’s inspired by the Mr Potato Bread loaf that I like eating from Bourke St Bakery so much. Because who doesn’t like to stuff carbs inside your carbs!
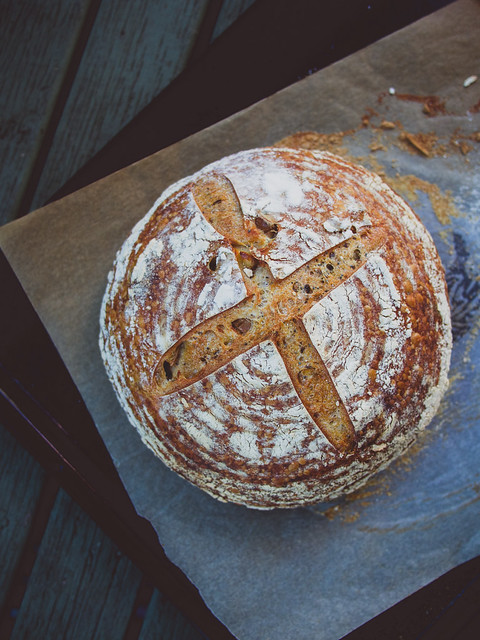
Rosemary & Potato Sourdough
Ingredients:
380g white bread flour
200g sourdough starter
200g water
10g salt
olive oil
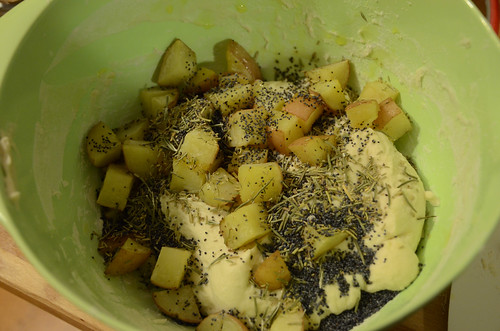
A few baby chat potatoes (or 1 normal sized potato). Around 100g will do, but of course this will vary depending on your potato. Anyway is there such thing as too much potato? Just do what I do and eat the leftovers.
A generous sprinkling of rosemary
Poppy seeds (about a teaspoon)
Method:
The Potato:
Preheat your oven to 200 degrees C
Cut your potato(s) into small cubes. I like to keep the skin on, but this will depend on the kind of potato you have.
Season with salt and pepper. Drizzle with olive oil and bake your potato cubes in the oven for 15mins. They should be just underdone (they’ll keep baking later on). When they’re done, transfer your potato cubes into a bowl and set aside to cool.
The Mixing:
Mix your flour, starter and water together in a large bowl.
Once the dough has come together, incorporate the salt. Knead using your preferred method until your gluten is developed (check this by making a gluten window).
Place your dough into an oiled bowl and cover with clingwrap. Let it rest for 20 mins.
Fold the potato, rosemary and sesame seeds into the dough. Keep folding until the ingredients are well mixed.
The Rise:
Place your dough back into your bowl, cover with clingwrap and let it bulk prove for another 2 hours. Give it a stretch & fold after 1 hour.
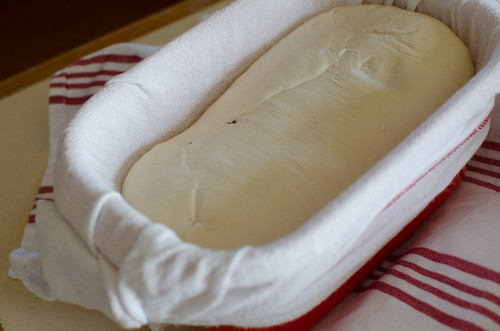
Preshape and leave to recover for 15 mins.
Final shape your dough. I like to shape this recipe into a boule. If you need help doing this, there’s a good instructional video here: How to Shape a Boule.
Place into generously floured round banneton (or a large non metallic bowl), seam side up. Cover loosely with clingwrap or a teatowel to stop them drying out.
Place into the fridge and let it prove in the fridge overnight (12-24 hrs)
The Baking:
The next morning – take your dough out of the fridge. Final proof until your dough roughly doubles in size. Check this using the “poke test” – poke the dough with your finger. If the indentation fills back immediately it’s underproofed, not at all then it’s overproofed. If it slowly fills up in a few seconds then it’s perfect!
Meanwhile, place a deep tray into your oven and preheat to 220˚C. Fill the tray with boiling water to create steam.
Dust loaf with flour. Slash and bake!
Bake for approx 45-50mins until the crust is golden brown.
Gardener’s Road Fresh Food Market
I love fresh food markets! But I don’t go to nearly enough of them. Because let’s be honest… the thing that I apparently love more than markets is a weekend sleep in. Which is why I was so pleased to hear about a new fresh food market starting up in my neighbourhood, no more than 10 minutes away!
Gardeners Road Fresh Food Market is held in the spacious playground of Gardeners Road public school in Rosebery, every Saturday from 8am-2pm. The markets only just started running a few weeks ago, so it’s very much a newcomer to the scene. I’ve been back a few times now and even in that short period of time the I’ve noticed an increase in crowds. Definitely a good indicator for positive word of mouth!
The markets have a friendly and laid-back atmosphere – there’s even a guy on an acoustic guitar entertaining the kiddies and serenading us as we shop. The stallholders have all been nice and happy to have a chat about what they’re selling. I’m looking forward to checking out more of them as the weeks go by.

Stalls at Gardeners Road Fresh Food Markets

There were MINIATURE PONIES from Pony Express! (for children to ride. Apparently I am too old. I know because I asked. AGEISM! :P)

Beautiful looking baguettes from the French Patisserie

Paul the Plant man


Fresh veggie stall

Lovely fresh kale. I bought 2 big bunches for $3. My local Coles supermarket definitely doesn’t stock this!
On our second visit I spied a seafood stand selling fresh shucked oysters, and a butcher. The nice lady at the butcher stall was really friendly and helped me pick out a lamb mini roast for dinner that night. She even gave me cooking suggestions… extremely useful for a roast newbie like me. Unfortunately I’ve misplaced the pamphlet she gave me about the products stocked in the van because I am a terrible blogger. But I do remember her mentioning that the meat sold is free range. And that they even sell sliced haggis! (vac-packed for your convenience)

I was also really pleased to see that JackieM had a stall. I’ve had her char kway teow at the Night Noodle Markets before – Malaysian stir fried rice noodles with the perfect balance of savoury and sweet, and with great ‘wok hei‘. JackieM’s stall at Gardeners Road Market is operated by Nick, while Jackie takes care of Orange Grove markets.


Chicken Char Kway Teow from JackieM Malaysian
Unfortunately first market day teething problems meant the stall had no chilli (!) – but the CKT was still very tasty.

Look at this awesome dude tucking in to some of Jackie’s Char Kway Teow!
Despite being the first day of operation, there were quite a lot of food options! There were some Gozleme ladies of course. It never feels like a proper market without seeing them hard at work creating those pastries.

Turkish Gozleme stall
Other options include a Quesedilla stall, a Crepe stall – and I also spied a Greek Souvlaki stall and a portable woodfire pizza oven! (sadly not pictured)


I’d be lying though, if I didn’t mention the stall I was most looking forward to seeing: Flour and Stone!

Flour and Stone’s Panna Cotta Lamingtons and, Lemon Curd/Raspberry and Vanilla custard filled donuts
Nadine Ingram’s Woolloomooloo bakery cafe, Flour and Stone, has fast become my top pick for sweet treats in Sydney. And judging from the queues that spill out onto the pavement outside her Riley St establishment – I’m not the only one who thinks so!
Nadine’s Panna Cotta Lamington would alone put Flour and Stone under legendary status in my books (seriously… there’s panna cotta in the lamington), if it weren’t for the fact that everything else there is so good too. From classics like Lemon Drizzle Cake and Old Fashioned Vanilla Cake to treats with an unexpected twist like Strawberry, Rosemary and Honey creme brûlée tarts – Flour and Stone serves up nostalgia for a time that honoured honest baking without fads or pretension.

Nadine Ingram from Flour and Stone
Like the Woolloomoolo cafe, everything at Flour and Stone’s market stall is beautifully presented, effortlessly showing off a tempting array of baked goods.
And I haven’t even mentioned their pies! Their Chicken, Leek and Tarragon pie is a must try:

Chicken, Leek and Tarragon pie
But really, you can’t go wrong:

Chocolate Brownies

The chocolate and salted caramel tart – had to pick up a slice of this to take home, couldn’t resist!
Gardeners Road Fresh Food Market is a welcome addition to the neighbourhood – and it’s exciting to see its popularity and stallholders grow. I’m already looking forward to the weekend so that I can go back!
Gardeners Road Fresh Food Market
cnr Gardeners & Botany Roads
Rosebery
Every Saturday from 8am – 2pm
Free Parking on site
Twitter: @GardenersRdMkt
Check out their Facebook page for updates and some great photos of each week’s market
Brasserie Bread – Poolish & Soakers class
crunchytiger attended this class as a guest of Brasserie Bread

My homemade ciabatta
Can you believe… I’ve been baking sourdough for almost a year now, ever since I attended my first Brasserie Bread Art of Sourdough class. There’s something addictive about baking it… the strange alchemy that turns flour, water & salt into something crackly, crunchy, fluffy and oh so delicious. I love not knowing how a loaf will exactly turn out until it’s baked. There’s always a new technique to be learnt, a better way of scoring the dough, a different hydration, or changing up the resting times to get those lovely airy holes. It’s really easy to fall down the rabbit hole of bread forums (Reddit’s BreadIt subreddit is currently my new favourite)
But as lovely as sourdough is, it does take a lot of time. Lately I’ve been branching out into other bread recipes that use yeast to speed up the process. Some recipes can even be mixed, baked and eaten within a couple of hours! (And after baking sourdough which typically needs to be rested for 12-14 hours… anything that can be eaten on the same day it’s started seems crazy fast to me!)
So when Sarah from Brasserie Bread asked if I’d be interested in attending the special Poolish and Soakers class they were running for the Crave festival last year, I jumped at the chance! (yep… this is a super suuuuuper late post!)
The class was run by the head of training at Brasserie Bread, Matt. As I’d already done a Brasserie Bread course before, a lot of the introduction was familiar to me, but it’s always nice having a reminder of good dough mixing technique!
Multigrain Struan
The first dough we made was a Multigrain Struan bread recipe. So many ingredients compared to my humble sourdough loaves!

This bread recipe uses two different techniques – a biga and a soaker.
The soaker is a mixture of flour, grains and milk which has been rested for 12 hours. This serves two purposes, firstly to hydrate the grains so they’re not too hard & tough in the final loaf, and secondly to develop flavour.
The biga is a type of pre-ferment. In this case it’s a dough mixture that’s been made the day before (or in a bakery it might be leftover dough from yesterday’s breadmaking!) which you add to today’s dough to give it a more developed flavour.

So many ingredients!
Queenie’s Jamaican Bar and Kitchen


crunchytiger dined as a guest of Jamie Thomas and Queenie’s
Take an old pub, fill it to the brim with hip up-cycled furniture, sprinkle with kitsch, add a solid food menu, open a twitter account that has a tendency to TYPE IN CAPITAL LETTERS… any of this sound familiar? 😉
It’s no secret that I’m a big fan of what the Drink ‘n’ Dine group do – they’re behind some of my favourite bars: The Abercrombie with its deep fried Golden Gaytime, The Carrington with their $3 Pinxtos, and The Forresters and The Norfolk with their sunny beer gardens and beloved $10 lunch menus. Each place has its own little quirks, but the one thing they do have in common is a food menu that is given as much attention as the drinks menu.
The man behind the curtain is Chef Jamie Thomas. Once the head chef of The Carrington, Jamie is now the executive chef of the Drink ‘n’ Dine group – a role that sees him designing menus across all four kitchens (now five, with the new opening of Kings Cross eatery, Santa Barbara!). Busy guy!
If that weren’t enough on his plate, Chef Jamie has invited us to check out Drink ‘n’ Dine’s new venture, Queenies – a new Jamaican bar and kitchen that lives in the once under-utilised space above The Forresters. I’ve heard how popular Jamaican food is in the UK, and it’s no surprise that Chef Jamie is a fan of it too. Jamie tells us he and his mates used to hit up Jamaican restaurants after their late shifts – the only places left open by the time they finished work!


It’s been a while since I’ve been upstairs at The Forresters, and wow is it different. DnD designer Michael Delany has created a cosy and kitsch Caribbean-themed space that includes an abundance of colourful plastic flowers and an impressive tiger head looming over the fireplace. (You can read a bit more about the fit-out and interior design here: Habitus Living – Carribbean Kaleidoscope)

Ahhh… my spirit animal!

We start off with some cocktails – mine’s a Zimboo Juice: aged cachaca, cointreau, tamarind and white grapefruit with a salt rubbed rim – a zesty combination that isn’t too sweet.
First up are the Bammies ($7) – which are a traditional Jamaican flat bread made from cassava. I really love the texture of the flat bread – it’s satisfyingly chewy with a slightly crisp and smokey grilled exterior. The bammies at Queenies come in two varieties, prawn and pulled pork. The savoury pulled pork goes well with the sweet fresh pineapple, but my favourite is the prawn… with whole grilled prawns and a lovely sweet mango salsa on top. I love the use of fresh fruit. I could really eat a few plates of these to myself!


Next up is the Coconut soft shell crab ($16) – it doesn’t quite look like the snow-white tempura soft shell crab that I’m used to. This batter is a deep rich yellow, with a touch of sweetness, though not a strong flavour of coconut like I expected. The Hotstepper sauce gives a bit of a spicy kick.

The Curried Oxtail “don’t call them The Carrington’s empanadas” Patties ($14) are piping hot, crispy envelopes of slow cooked oxtail meat, and come with a surprising Cucumber and Chili Yoghurt – all at once soothing and spicy on the tongue.

Our next dish, the BBQ Jerk Corn ($8) quickly gets nicknamed Lamington corn by the table – thanks to its shredded coconut exterior and surprising sweetness. The corn’s coating is creamy and buttery, with a hint of jerk spice. The presentation is cute too, served in half an egg carton, with skewers that will be familiar to those who’ve eaten The Carrington’s famous Pinxtos!

The Calypso Coffee Ribs ($15) don’t have a particularly strong coffee flavour like I’d expected, but are nevertheless wonderfully smokey and sticky. The just meat falls off the bone. And no wonder too, as Chef Jamie reveals that they’re slow-cooked in a 65˚C water bath for many hours.

The Hellshire Ceviche ($16) is one of my favourite dishes of the night. Thinly sliced pieces of snapper have been marinated in lime juice and are topped with coriander, avocado, mango and chilli. So fresh and lovely. The sweetness of the mango goes so well with the tangy marinade. Pop all of that on a crunchy tortilla chip, and it’s a perfect refreshing bite after the sticky ribs.

Pushcart Chicken Wings ($14), like the ribs, are basted in a sauce similar to the Calpyso ribs. While they’re good (and easy to hold thanks to being ‘frenched’) I think the ribs still win my vote, being just that bit more flavourful.

It’s at this point in the evening when Jamie comes out to see how we’re tracking… and if we’re ready for our mains. WHAT. I don’t know about anyone else on the table, but I’d been eating with a hoggish glee, with no regard for pacing myself. These were just the entrees?!
First up from the mains is a bowl of Goat Curry ($28). The meat is tender, and the curry flavourful and comforting. However, a combination of dark lighting and my own greed meant that I didn’t realise the little chunks of meat were served on the bone… whoops that was a solid bite! The curry is served on top of a pile of Dirty Rice.

The aforementioned Dirty Rice ($5 as a side) is long-grain rice flavoured with chopped coriander, spring onions, mint and all-spice. The fresh herbs make it a refreshing accompaniment to the hearty curry.

Despite my fullness I can’t say no to Sweet Potato Fries ($9). Crisp on the outside and fluffy inside, there’s always room for chips!

Another favourite of the night was the salad, a combination of cashews, cabbage, radish, coriander, mango and lime juice. So refreshing, I continued to eat this crunchy salad by the forkful all night, despite being way past the point of fullness.

Chef Jamie then brings out these trays laden with impressive pieces of jerk spiced meat – first up is the BBQ Jerk Chicken, served with Jungle Slaw ($18). Beneath the deliciously spicy, smokey jerk rub, the chicken is perfectly cooked and shreds into beautiful chunks.

The Jerk Pork Neck ($35) on the other hand, comes out on a large tray just made for sharing. For $35, the Jerk spiced pork is served with an assortment of crusty bread rolls, sweet potato fries, jungle slaw and a spicy Pineapple and Chilli salsa. The menu says it will feed 3-4. I love the idea of this! I can definitely see myself and some friends ordering a tray like this and being perfectly content. Though the Jerk Pork is delicious, I think my favour lies with the Jerk Chicken.

Just when we are contemplating how we will manage to roll back down Foveaux street when this meal is over, Jamie brings out some desserts – just a few to share. Time to engage my dessert stomach!
The Piña Colada sundae is a perfect way to end such a hearty meal. The coconut icecream and pineapple flavours are light and refreshing, with a cherry coulis to keep it from getting too sweet.

The Donuts on the other hand almost defeat me! Denser and smaller than your average donut, they have an interesting chewy texture. Fans of chili and chocolate will enjoy this dessert, thanks to the slight spiciness of the jerk custard and chocolate sauce.

Altogether we had an awesome meal. Though the particular standouts for me were the Bammies and Ceviche, I just love the convivial atmosphere the star dishes like the Jerk Chicken and Jerk Pork Neck create. Like a big family dinner, but with cocktails! Many thanks to Chef Jamie for his hospitality. I’ll definitely be coming back… and with friends!
Queenies (on top of Forresters Hotel)
336 Riley St (Corner of Foveaux and Riley)
Surry Hills
Ph: 9212 3035
Open:
Tuesday – Saturday: 6pm until Late
Also open for lunch on Fridays: 12pm- 3pm
Twitter: @queenies_
[Recipe] Almond Cinnamon Rolls
I haven’t been blogging a heap lately! Mostly because all I seem to be baking is variations of sourdough. I think I’ve mentioned before that I don’t have the biggest sweet tooth – I could be happy just eating slices of sourdough slathered in vegemite every day.
But the other week I had a hankering for something a bit sweeter and not too complicated, so I made a batch of these Almond Cinnamon rolls! They’re a soft sweet bread, made with eggs and milk, and a lot quicker to whip up than my usual bread recipes. The dough is quite a bit wetter than other bread dough, so I cheated and used my mixer with dough hooks rather than mixing by hand. But if you don’t have access to one of those, mixing by hand is perfectly fine (I’ve done it both ways now)… albeit a bit more messy.

Cinnamon rolls! Perfect for afternoon tea
[Recipe] Easy Sourdough Pancakes

Sourdough pancakes – Ultra lazy version
I’ve been baking sourdough bread pretty regularly these days! I’ve got a routine going. Thursday I’ll start ramping up my starter feeding schedule, so that it’ll be ready to mix on Friday night or Saturday morning (wooo… paaaarty hard! that’s me!).
Though I love having freshly baked bread every week, the serious downside to maintaining a sourdough starter is the sheer amount of wastage that goes into feeding the darn thing. Unless you’re actually bakery, or one of those insane people who bake every day, it’s inevitable that a lot of starter will get discarded to keep it at a manageable weight. As a result, I’ve thrown out a lot of flour & water over the past few months, and it doesn’t feel great!
Luckily, bakers are a pretty resourceful lot, and I’ve been reading up on some useful ways of using up that discarded starter. So far my favourite (and my family’s favourite) way is to make huge stacks of sourdough pancakes!
They’re a really easy way to impress. The pancakes are fluffier and airier than your average pancakes, have a chewier texture, and a lightly sour flavour (not quite as strong as sourdough bread).

Sourdough pancakes topped with yoghurt and fresh strawberries
It’s a pretty simple recipe! Like all sourdough-related recipes, it does take a bit of planning and prep. If I’m planning on having pancakes for Sunday breakfast, I’ll mix up a batch before I go to bed on Saturday night, and leave it to rest overnight. It’s a great recipe for lazy weekends!
This recipe also comes in an Ultra Lazy Edition. If I’m ultra lazy, I’ll skip the overnight wait altogether, and use a bit of bicarb soda to help it along. You won’t get as full a sourdough flavour, and the pancakes won’t be quite as fluffy, but they are still pretty great.

Sourdough pancakes – overnight version. Uglier, but more delicious!
The fun part about this recipe is that it doesn’t require any rising agent to become so fluffy! It gets it all from the starter. It’s also the reason why you need to give it a bit of time to recover after you whisk the eggs in. If you’re in a hurry, skip to my Ultra Lazy Edition notes at the bottom of the page – and it’ll give you some tips on adding bicarb soda to give it more oomph.

What my pancake batter looks like the next morning. Bubbly!

BUBBLES!
I’ve been trying out different toppings too (ie. whatever is in the fridge on Sunday morning). Fresh fruit is always a winner for me, though lately I’ve taken to grilling bananas lightly in a frying pan with a little bit of butter. Yum!

Banana slices with salted caramel sauce

Grilled bananas topped with shredded coconut and honey

My boyfriend on the other hand prefers them savoury! Fried on top of fried.
Sourdough Pancakes (makes approx 14 pancakes)
The night before – mix these ingredients together in a BIG bowl (best to use a plastic mixing bowl otherwise the acid in the starter can react funnily to metal bowls overnight):
1 cup unfed sourdough starter
2 cups water
2 1/2 cups flour (I like to use a mix of wholemeal and plain flour, but it’s up to you)
Cover with clingwrap and leave overnight at room temp (I leave it on top of my fridge). The mixture will expand a lot!
The next morning –
Whisk in:
3 eggs beaten with 1/4 cup brown sugar
1 tsp of salt (adjust to taste)
As always, sourdough recipes vary a bit depending on the state of your starter. My starter has a high water content, so that’s the ratio that worked for me. If your batter is too thick, you can add a bit of milk at this stage to thin the mixture out. You want a thick pancake batter consistency though, not crepe.
Leave mixture for 1 hour to recover. Once it’s become bubbly again…
Heat up your pan and coat very lightly with butter. Fry pancakes!
BONUS! ULTRA LAZY EDITION aka hangover Sunday version:
Proceed as normal, but skip the overnight wait. Instead, when your pan is just about ready to go… mix 1 tsp of bicarb with 1 tsp of water in a small bowl. Stir that into your mixture. It should react with the acidity and start to bubble (yay chemistry!). Once the mixture is all nice and bubbly…
IT’S PANCAKE TIME!
Tingha Chinese Restaurant – Sydney Markets

I met some of my best friends in the world at uni. We bonded over ridiculous deadlines, early-morning typography classes, soporific avant-garde film lectures, a mutual love of marsupial tennis, and of course a mutual love of FOOD!
These days it’s harder to gather everyone together to share a meal. But after I told them about the crab special at Tingha Chinese Restaurant at the Sydney Markets, it wasn’t too hard to rally the troops. All 14 of us!
There’s apparently another Tingha Chinese Restaurant in Parramatta, but we went to the one adjacent to the Sydney Markets in Homebush. It’s inside the Tiger’s Club there, and as such looks quite unassuming from the outside. But walk past the pokie rooms and you’ll find a bustling Chinese restaurant – filled to the brim with families eating platters of crab.
Crab definitely seems to be the thing to order here. And no wonder! The special is communicated to us through a laminated piece of paper placed on our table – all of the text is in Chinese (which I can’t read) except for the giant $8.80 written in big letters. That’s right! Tingha somehow manages to sell mudcrab at $8.80 per half kilo (that’s $17.60 per kilo for those like me who are mathematically uninclined) – which is apparently under market price (or so the waiter tells me). For that reason, the restaurant accepts cash-only for the special (don’t worry, there are ATMs available in the Leagues Club).
With 14 people at the table, I order us 6kg of crab. Each crab weighs a little bit over 1kg (though of course a lot of that is the shell). You can choose from a few different ways for it to be cooked – XO Sauce, Ginger & Shallots or Salt & Chilli Pepper. We go with Ginger & Shallots.

Live crabs presented to us. I never really know what I’m meant to be looking for… so I just say OK. Sorry crabbies!

6.3kg of crab!! ($111)
It’s awesome. Perfectly cooked and the sauce is deliciously savoury. Our noisy table descends into utter silence – except for the occasional cracking of shells and the squeaking of the Lazy Susan.
We’re definitely here for the mudcrab, but I decide to order us an assortment of other dishes too:
Pippis cooked in XO sauce with crispy noodles ($43.80). The waiter recommended we purchase 2 servings for our table of 14, but we decide to go with just one. I’m glad we did because it’s ginormous! Everyone likes pippis, but I really love the crispy vermicelli noodles underneath! It goes great with the XO sauce.

Shantang Chicken ($17.50 for a half chicken) – twice cooked crispy skin chicken in a sweet soy and vinegar sauce is definitely moreish. The chopped garlic, shallots and chilli give it a bit of a kick, and the chicken is nice and tender, with crispy skin.

Salt & Chilli Pepper Pork Ribs ($16.50) – Super succulent pork covered in a crunchy spiced batter. My absolute favourite favourite dish of the night (besides the crab) are these deep fried pork ribs! So much so that I ordered 2 plates, just to make sure everyone could have some (and that I could have 2 pieces haha). I don’t know why these are so good, but they are (If I were to guess it’d probably the liberal amount of 5-spice and MSG… mm-mmm!)

Salt & Pepper Whitebait – crispy little morsels of fish in a light batter. Our resident spearfisher & seafood expert pronounced these to be “wicked”.

Salt & Pepper Tofu ($14.80) – … are you sensing a theme yet? This time it’s big pillows of soft tofu in the same light salt & pepper batter. A nice change from the seafood & meat heavy dishes.

Mongolian Beef ($15.80) – I didn’t try this as I was quickly reaching extreme fullness, but a sizzling plate is always very impressive…!

Special Fried Rice ($12.80) – arrives a bit late in the game when everyone was a bit full. But seeing the giant prawns perched on top tempted me into eating at least a little bit! Seriously… I haven’t seen such big prawns in a fried rice anywhere else I can think of! There were the normal little prawns mixed in there too, along with ham, chicken and egg.

We also ordered a platter of Stir Fried Chinese Vegies ($13.80) and a plate of Salt & Pepper Calamari ($18.80) which I didn’t manage to take a photos of.
Of course, as is customary at many Chinese restaurants, our giant feast was finished with a platter of orange wedges and bowls of red bean soup (I ate a lot of the former, and not so much of the latter)


Completely satisfying meal – and best of all, the price came to less than $24 each per person, including our mountain of crab at the beginning. At that price we’ll have to organise some group meals more often 🙂

Tingha Chinese Restaurant Sydney Markets
Tigers Club
Shop 16 Markets Plaza,
Markets, 250 Parramatta Road
Homebush West NSW 2140
ph: 8789 3636 (I recommend booking on weekends as it gets quite packed. And the waiter recommended calling up before you go just to make sure the crab special is still available)
Just another update this month, to follow my first post about baking sourdough. I’ve been baking once almost every week for the past few months now and I think I’m starting to see some improvement! Still feel like I’m very much a beginner, but at the same time feeling a bit more confident with the process.
That being said, every time a loaf goes into the oven I still mutter a quiet prayer to Ceiling Cat. A treacherous part of my brain will always remain convinced my bread might fail!
White Sourdough:


This was actually my first time making 2 loaves at once. Actually found it a bit tiring hand mixing over a kilo of dough at a time (I’m a real weakling). But quite fun to experiment with different scoring and seeing how they effect the final result.

I think these loaves had the best crumb so far! Big big bubbles. I think I actually squealed with glee when I cut this one open.

White Sourdough topped with linseed:
Still, sometimes it doesn’t always go to plan. I have no idea why this dough turned out so liquidy – eventually I gave up and put it in a loaf tin and hoped for the best. I sprinkled the top with some linseed and poppyseed (my go-to combination it seems. At least until I invest in more seed packets!)


Here you can see the dough before and after final proof. Before baking I lightly scored the top with a straight line down the middle.

The finished loaf! So relieved that it turned out. Though actually prying it out of the tin was a bit of a struggle. Note to self: non-stick pan is not very non-stick.

Quite a bubbly crumb in the end! Lots of small holes rather than big ones.
Linseed and poppyseed white sourdough:
With this loaf, I mixed in some linseed and poppyseeds right before my bulk ferment.


Light wholemeal sourdough loaf:
With this bread I followed my usual recipe from Brasserie Bread for a white sourdough batard, but substituted a cup of white flour for wholemeal (just regular wholemeal flour from the supermarket. I found that even the Coles brand had a quite high protein level that was sufficient for baking).

Formed the batard with some pointy tips this time…. getting proper fannnncy!


Was so pleased with the look of this one! Definitely the tallest bread I’d made so far. While shaping this batard I tried to pay more attention to the way I rolled the dough – trying to keep it tight and even, and sealing the ends into points. Watching this video on youtube on shaping was really useful on different techniques of shaping dough (and how good is his accent!! “this-a-way!”):


Some large holes inside! Also pls note delicious cheese.

Half wholemeal Sourdough Loaf:
This past weekend, I baked two loaves – as I gifted one to my friend Charles (you should totally check out his amazing art blog here: Minitreehouse – I guarantee you will be blown away!). This time the recipe was half wholemeal.


Before and after proofing! Look at the size difference (esp the distance between the two loaves)


What follows is a very basic recipe for what I baked on the weekend, and assumes that you already have access to a sourdough starter. As I didn’t create my sourdough starter from scratch I don’t feel quite qualified to give any instruction on creating your own, but the Bourke St Bakery book which I’ve recommended in my blog before has a very detailed section on creating a starter.
This recipe also assumes basic bread-making knowledge. I go into further detail about beginner bread-making in this post: Schiacciata Con L’Uva, and have some musings about beginner sourdough baking in this post here: Sourdough – A work in progress update in case it’s useful to you.
And of course if you’re serious about learning how to bake sourdough bread, I can’t recommend the Brasserie Bread classes more highly enough. You can read about my experience at the class I attended here: Brasserie Bread Art of Sourdough Class.
For a makeshift banneton (the bowl that holds the bread dough as it proves so that it keeps its shape), I’ve been using large bright red Décor tupperware containers with a teatowel knotted tightly at both ends. It creates a kind of sling for my baby dough to rest in:
Simple yet effective!
As I’m quickly realising, sourdough baking is as much (if not more) to do with technique than any particular recipe – so do feel free to adapt the recipe to fit your usual baking process. This recipe works well with my 100% hydration starter (if you like reading way too much information on the topic like I do, this is a good page: Maintaining a 100% Hydration Starter)
Of course if you have any other questions, leave me a comment and I’ll do my best to answer!
Half Wholemeal Sourdough Batard
(Based on a Brasserie Bread white sourdough batard recipe. Makes 2 loaves)
Ingredients:
380g unbleached white baking flour (I’m using Kialla organic unbleached plain flour)
380g wholemeal flour (I’m using Coles homebrand)
400g starter
410g chilled water
18g salt
Linseed/Poppyseed for topping (optional)
Method:
Add the two flours into a large bowl and stir to mix them up. Add the water and the starter.
Mix by hand for a few minutes. Turn out onto an unfloured board.
Once the dough has come together, incorporate the salt. Knead using your preferred method until your gluten is developed (check this by making a gluten window).
Place your dough into an oiled bowl and cover with clingwrap. Let it rest for 20 mins.
Fold into 3rds. Stretch the dough slightly, and fold into 3rds again. Place your dough back into your bowl, cover with clingwrap and let it bulk prove for another 2 hours.
Divide your dough into two using a knife or a dough scraper (use your kitchen scale to make sure the two loaves are the same weight). Preshape and leave to recover for 15 mins.
Final shape your doughs. Place into generously floured bannetons if using, or onto a tray lined with a floured tea-towel. Seam side up. Cover loosely with clingwrap or a teatowel to stop them drying out.
Place into the fridge and let them prove in the fridge overnight (12-24 hrs)
The next morning – take your dough out of the fridge. Final proof until your dough roughly doubles in size. Check this using the “poke test” – poke the dough with your finger. If the indentation fills back immediately it’s underproofed, not at all then it’s overproofed, if it slowly fills up in a few seconds then it’s perfect!
Meanwhile, place a deep tray into your oven and preheat to 200˚C. Boil a kettle of water. Once your oven is hot, pour the boiling water into the hot tray. This will create a lot of steam and will help your dough rise in the oven and form a crispy crust!
Dust loaves with flour (and seeds if using – sometimes I mist my loaves with a bit of water from a spray bottle to make the toppings stick!). Slash and bake!
Bake for approx 45-50mins until the crust is golden brown.
Remove from oven and let them cool before eating the heck out of your freshly made bread!
The Carrington – Tuesday $3 Pintxos


$3 Pork belly sliders at The Carrington
There’s no doubt that this is a tough time for restaurateurs: tighter purse strings, high rents, an incessant parade of new eateries and a flighty dining public only interested in flocking around the latest shiny new thing. Every week we’re hearing of new closures – and it seems like the trend is unlikely to end soon.
So how are restaurants luring in customers in such a difficult climate? Well… coupons and deep discounting are certainly one way to lure in potential new diners. But from my own experience as a greedy diner, I know my loyalty is only as good as whatever coupon website will give me the next best discount. And though I love a good half-price coupon as much as anyone, it hasn’t escaped my notice that four restaurants I’ve purchased coupons from in the past have since closed for business…
So if massive discounts miss the mark, what then? An alternative to chasing the high-volume injection of coupon customers might be found in the somewhat old fashioned method of drawing in locals and courting repeat business. Now I’m definitely no business expert, but I think a great example of this is what’s happening up at The Carrington in Surry Hills!
Thanks to the strong social media presence of both @carringtonhotel and @jamiecarrington – you may already be familiar with some of the many daily specials The Carrington dishes up each week. From Monday $10 Meatball night to Sunday Spanglish Roast Dinner, these daily specials are a fun way to offer novelty, variety and also the cheeky feeling of getting a good deal. It’s also a formula that seems to be working well at other venues backed by publicans, Jaime Wirth and James Miller: The Forresters, The Norfolk and The Abercrombie (try get a seat next Tuesday at The Norfolk’s $3 taco night and you’ll see what I mean.)
But this blog is about Tuesday $3 Pintxos night, so I better get on with it! Every Tuesday, Chef Jamie Thomas and his team at The Carrington hotel run $3 Pintxos night – crafting a specials menu of 5 different $3 pintxos which vary from week to week. I have to admit I still don’t know how to pronounce it without mumbling and looking off into the distance, but “Pintxos” is a Spanish/Basque term for a bar snack; often spiked with a toothpick. I especially love how Chef Jamie tweets out a twitpic of the night’s pintxos dishes.


The Carrington’s Pinxtos night menu for 18/06/12, and a Paella Ball with crispy squid
It’s fun, it’s cheap (you can get a platter of one of each pintxos for a very unprincely sum of $15!), and best of all – it’s reliable. Just like Thursday-late-night-shopping and Tight-Arse-Tuesdays at the movies, Tuesday night at The Carrington is pintxos night (at least it is at the time I’m writing this haha – the future is uncertain after all)


One of each! For a grand total of $15
The changing rotation of pintxos is fun too, and a good incentive to come back. I’ve been twice in the past month alone… and I’m sure I’ll be back again soon. On the particular week we visit, the menu includes:
Rare roast beef with beetroot and horseradish – I like the zingy horseradish sauce with the sweet beetroot spread. And the beef is melt in the mouth.


The Sweet Potato & Smoked Cheddar Tortilla is like your best ever creamy potato bake, and it’s great fun biting through all the layers.
Paella Ball with Crispy Squid is probably my favourite of the night. The outside is just so crisp, with a surprising black squid ink paella inside.


Smoked Eggplant and Pomegranate tostada is lovely and indeed smokey, with little bursts of sweetness from the pomegranate seeds. But would have been even nicer if the bread was still crispy.

Pork Belly Slider, Pickled Cabbage looks glorious! The pickled cabbage slaw cuts through the rich pork belly slice. I’ve got a little piece of extra crackling pinned on top of my bun, but a few others at my table are a bit disappointed to be missing their pieces. If you’re someone who likes volume for your dollar though, this is definitely the one to get. For $3 it’s an absolute bargain.
Of course we can’t let the opportunity pass by the grab some dessert and drinks too. We grab a jug of the Single Mother cocktail ($25 a jug) – red wine, southern comfort, nutmeg, sugar topped with ginger beer. If ever a sangria tasted like Christmas this would be it. And my friends get a deconstructed Banana Split with Fried Milk to share. The fried milk comes out looking like fried cube-like donuts, complete with brown crust topped with sugar and cinnamon. But inside is like a milk pudding! Don’t ask me how it’s done, but it’s delicious (googling Leche Frita recipes gives me a bit of a hint though!).

Another friend orders a Creme Catalana – which is like a citrus flavoured creme brulee – a bit less exciting than fried milk but still tasty:

(Woops… dodgy focus)


Hereby dubbed “Slider-face”
It’s all a lot of fun. Beautifully crafted pintxos for a bargain (seriously… that’s a lot of pintxos to serve in one night), good drinks, friendly service, cosy atmosphere that’s neither too loud nor too fussy. And they take bookings! (huzzah!) What’s not to love.

The Carrington
565 Bourke Street
Surry Hills NSW 2010
Ph: 02 9360 4714
Bookings can be made through info@the-carrington.com.au
Twitter: @carringtonhotel and @jamiecarrington


